A layby account can only be used for one sale. If a customer has a layby completed or cancelled, and wants to purchase more products on layby, a new layby account must be created.
To create a new layby account:
Micronet displays the Enter Transaction screen.
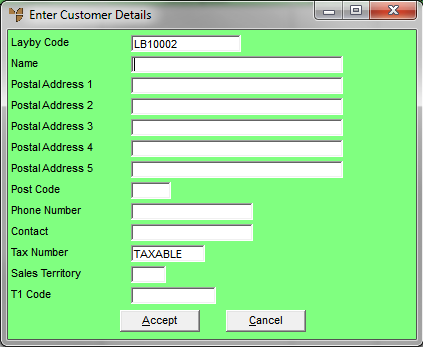
Micronet displays the Enter Customer Details screen.

|
|
Field |
Value |
|
|
Layby Code |
Micronet generates the layby account code. The account prefix (e.g. LAYBYxxx) can be altered in your company configuration. |
|
|
Name |
Enter the customer's first name followed by their last name. |
|
|
Post Address 1, 2, 3, 4, 5 |
Enter up to five lines of postal address details for the customer, e.g. unit number, street address, suburb and state. Note that the details you enter here are used by Micronet to send late payment letters, so ensure they are correct. |
|
|
Post Code |
Enter the customer's postcode. This enables postcode sales reporting or searching by postcodes. |
|
|
Phone Number |
Enter the customer's phone number. If you only know the customer's mobile number, enter it in this field. |
|
|
Contact |
Enter a contract name if required. |
|
|
Sales Territory |
Enter the customer's default sales territory if required, or you can press Enter to select a sales territory. This allows grouping of customers into sales territories or regions for reporting and analysis. |
Micronet creates a new debtor account in the Debtor master file and redisplays the Enter Transaction screen.
Refer to "Creating a New Docket, Layby or Quote".